API 点名(离线)
把支持面表里 state=ok 的名字成批点名:76 个颜色、16 个速率、方向常量、方法面、形状与 3D 实体、动画面与复平面。
本页 14 条示例。代码引自 corpus/examples/api/,截图为真机渲染的终态。
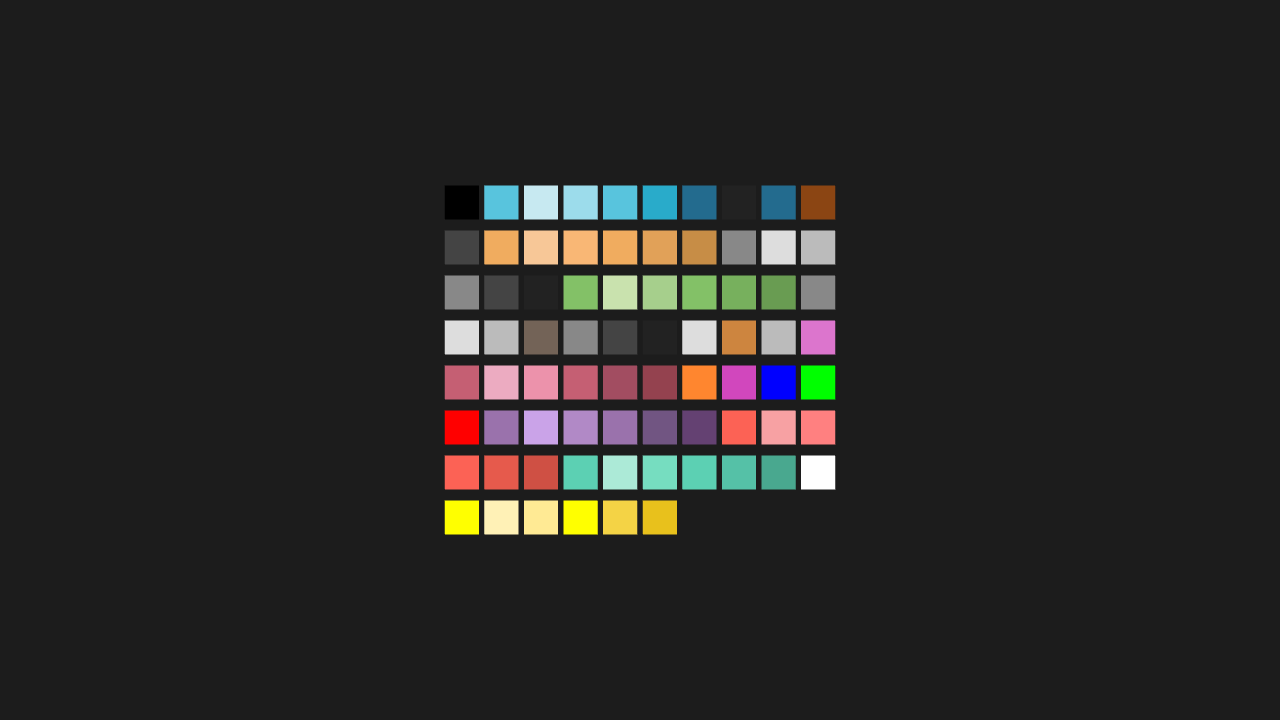
API 覆盖:颜色常量一览(全部 76 个可用色)
76 个方块按每行 10 个排成色板,每块用自己的名字上色(红黄蓝绿紫灰棕……各不相同)——不是一整片黑(黑 = 修过的 set_stroke 冲掉填充的事故)。
"""API 覆盖:颜色常量一览(全部 76 个可用色)

@expect 76 个方块按每行 10 个排成色板,每块用自己的名字上色(红黄蓝绿紫灰棕……各不相同)——不是一整片黑(黑 = 修过的 set_stroke 冲掉填充的事故)。
@note 这一组是「API 覆盖」的兜底网:三态表里 state=ok 的**颜色名**逐个上色。
      以前语料只用到十来个颜色,于是 `GREEN_A` / `GREY_BROWN` 这类名字写错(或桥没接上)
      要等某个用户随手写一次才暴露——这里一次性把整张调色板钉住。
      名字写在下面的清单里(不是循环拼出来的),这样「谁被覆盖了」在源码上就看得见。
"""

from manim import *

NAMES = [
    "BLACK", "BLUE", "BLUE_A", "BLUE_B", "BLUE_C", "BLUE_D", "BLUE_E",
    "DARKER_GRAY", "DARK_BLUE", "DARK_BROWN", "DARK_GRAY",
    "GOLD", "GOLD_A", "GOLD_B", "GOLD_C", "GOLD_D", "GOLD_E",
    "GRAY", "GRAY_A", "GRAY_B", "GRAY_C", "GRAY_D", "GRAY_E",
    "GREEN", "GREEN_A", "GREEN_B", "GREEN_C", "GREEN_D", "GREEN_E",
    "GREY", "GREY_A", "GREY_B", "GREY_BROWN", "GREY_C", "GREY_D", "GREY_E",
    "LIGHTER_GRAY", "LIGHT_BROWN", "LIGHT_GRAY", "LIGHT_PINK",
    "MAROON", "MAROON_A", "MAROON_B", "MAROON_C", "MAROON_D", "MAROON_E",
    "ORANGE", "PINK", "PURE_BLUE", "PURE_GREEN", "PURE_RED",
    "PURPLE", "PURPLE_A", "PURPLE_B", "PURPLE_C", "PURPLE_D", "PURPLE_E",
    "RED", "RED_A", "RED_B", "RED_C", "RED_D", "RED_E",
    "TEAL", "TEAL_A", "TEAL_B", "TEAL_C", "TEAL_D", "TEAL_E",
    "WHITE", "YELLOW", "YELLOW_A", "YELLOW_B", "YELLOW_C", "YELLOW_D", "YELLOW_E",
]

PER_ROW = 10
SWATCH = 0.38

# 名字 → 颜色值:`from manim import *` 把它们带进本模块的 globals
swatches = VGroup(*[
    Square(side_length=SWATCH)
    .set_fill(globals()[name], opacity=1.0)
    .set_stroke(width=0, color=BLACK)
    .move_to([
        (i % PER_ROW) * (SWATCH + 0.06) - (PER_ROW - 1) * (SWATCH + 0.06) / 2,
        (len(NAMES) // PER_ROW) / 2 * (SWATCH + 0.12) - (i // PER_ROW) * (SWATCH + 0.12),
        0,
    ])
    for i, name in enumerate(NAMES)
])
print("api-colors", len(NAMES), len(swatches))


class ApiColorsScene(Scene):
    def construct(self):
        self.play(LaggedStart(*[FadeIn(s) for s in swatches], lag_ratio=0.004))
        self.wait(0.3)
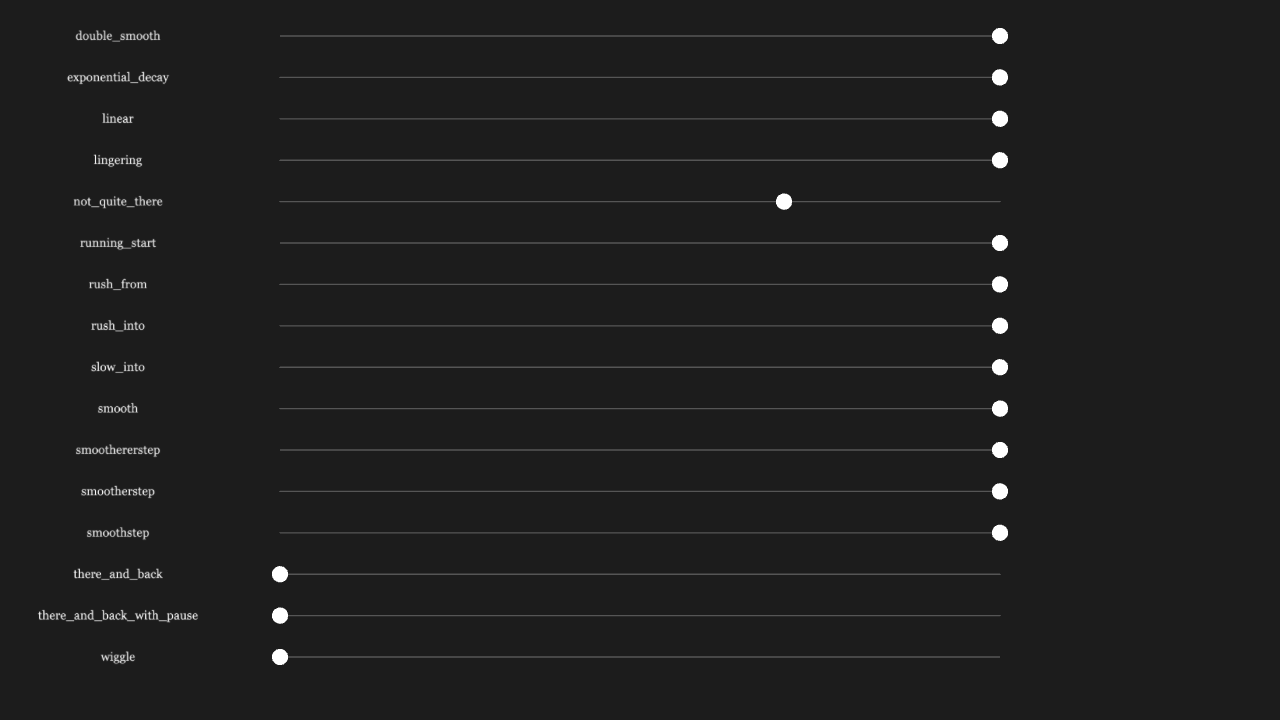
API 点名:全部 16 个速率函数
十六行,每行一个速率名 + 一颗圆点:圆点都从左走到右、走完同样的距离,但每一行的节奏就是它的名字——smooth 先快后缓、rush_into 起步就冲、there_and_back 走到头又折返回来、wiggle 原地抖几下。看的不是终点,是「怎么走」。
"""API 点名:全部 16 个速率函数

@expect 十六行,每行一个速率名 + 一颗圆点:圆点都从左走到右、走完同样的距离,
        但每一行的节奏就是它的名字——smooth 先快后缓、rush_into 起步就冲、
        there_and_back 走到头又折返回来、wiggle 原地抖几下。看的不是终点,是「怎么走」。

@note 三态表里 kind=rate、state=ok 的名字逐个点一遍。以前语料只用到 smooth 与 there_and_back,
      其余名字写错(或桥的 rateFunction 拿不到、柯里化没先调一次)要等用户随手写一次才暴露。
      rate_func 传的是速率**名**(字符串),所以这里用 globals() 按名取——名字写在清单里,
      「谁被覆盖了」在源码上看得见(不是循环拼出来的)。
      旧版把 16 颗点先后 Create 出来,速率根本没得看——速率是「时间怎么分配」,必须让物体
      真的走一段路才看得出来。
"""

from manim import *

RATES = [
    "double_smooth",
    "exponential_decay",
    "linear",
    "lingering",
    "not_quite_there",
    "running_start",
    "rush_from",
    "rush_into",
    "slow_into",
    "smooth",
    "smoothererstep",
    "smootherstep",
    "smoothstep",
    "there_and_back",
    "there_and_back_with_pause",
    "wiggle",
]

print("api-rates", len(RATES), all(isinstance(globals()[name], str) for name in RATES))

X0 = -4.0
SPAN = 8.0
TOP = 3.6
STEP = 0.46


class ApiRatesScene(Scene):
    def construct(self):
        dots = []
        for i, name in enumerate(RATES):
            y = TOP - i * STEP
            label = Text(name, font_size=13).move_to([-5.8, y, 0])
            track = Line([X0, y, 0], [X0 + SPAN, y, 0]).set_stroke(width=1.5, opacity=0.25)
            dot = Dot([X0, y, 0], radius=0.09)
            self.add(label, track, dot)
            dots.append(dot)
        for i, name in enumerate(RATES):
            self.play(dots[i].animate.shift([SPAN, 0, 0]), rate_func=globals()[name], run_time=1.1)
        self.wait(0.2)
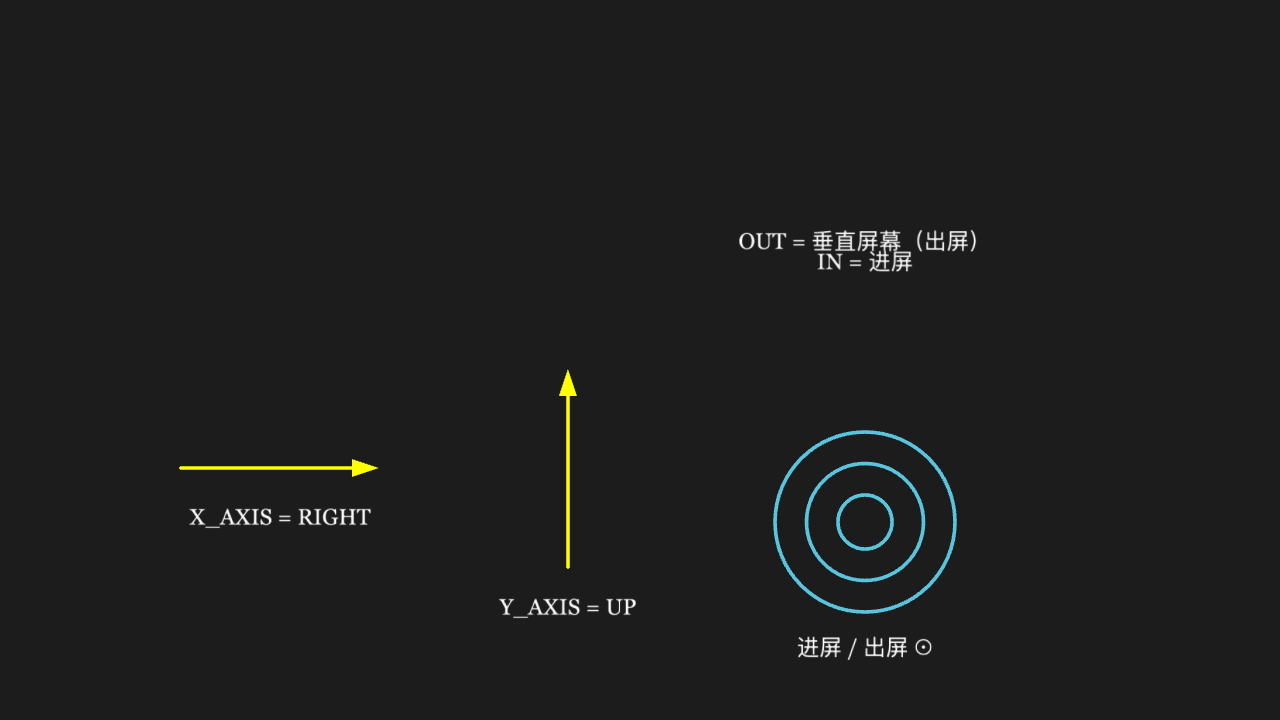
API 点名:方向与轴向常量
几支箭头分别指向 RIGHT/UP/OUT 等常量对应的方向,方向与名字一致;轴向常量参与的定位不偏。
"""API 点名:方向与轴向常量

@expect 几支箭头分别指向 RIGHT/UP/OUT 等常量对应的方向,方向与名字一致;轴向常量参与的定位不偏。
@note 方向常量在适配层就是 numpy 向量(UP * 0.2、RIGHT * 2 逐元素运算处处都是)。
      这里点 X_AXIS / Y_AXIS / Z_AXIS / IN / OUT:CE 里 X_AXIS 就是 RIGHT、Z_AXIS 就是 OUT,
      Axes / ThreeDAxes 相关代码常直接拿它当方向用——写不出这几个名字就会是 NameError。
"""

from manim import *
import numpy as np

CHECKS = [
    (X_AXIS, RIGHT),
    (Y_AXIS, UP),
    (Z_AXIS, OUT),
    (IN, -OUT),
]
print("api-const", len(CHECKS), all(np.array_equal(a, b) for a, b in CHECKS))


class ApiConstScene(Scene):
    def construct(self):
        # X/Y 轴方向:两支有头箭头,方向可读
        arrow_x = Arrow(ORIGIN, RIGHT * 2.2, buff=0, color=YELLOW)
        arrow_y = Arrow(ORIGIN, UP * 2.2, buff=0, color=YELLOW)
        arrow_x.move_to([-4, -1.2, 0])
        arrow_y.move_to([-0.8, -1.2, 0])
        label_x = Text("X_AXIS = RIGHT", font_size=24).next_to(arrow_x, DOWN, buff=0.3)
        label_y = Text("Y_AXIS = UP", font_size=24).next_to(arrow_y, DOWN, buff=0.3)
        self.add(arrow_x, arrow_y, label_x, label_y)
        # Z_AXIS/OUT 与 IN 在 2D 投影为零——用说明卡 + 同心圆示意进屏/出屏
        card = Text("OUT = 垂直屏幕(出屏)\nIN = 进屏", font_size=24, line_spacing=0.6)
        card.move_to([2.5, 1.2, 0])
        rings = VGroup(*[Circle(radius=0.3 + 0.35 * i, color=BLUE) for i in range(3)])
        rings.move_to([2.5, -1.8, 0])
        rings_label = Text("进屏 / 出屏 ⊙", font_size=24).next_to(rings, DOWN)
        self.add(card, rings, rings_label)
        self.wait(0.3)
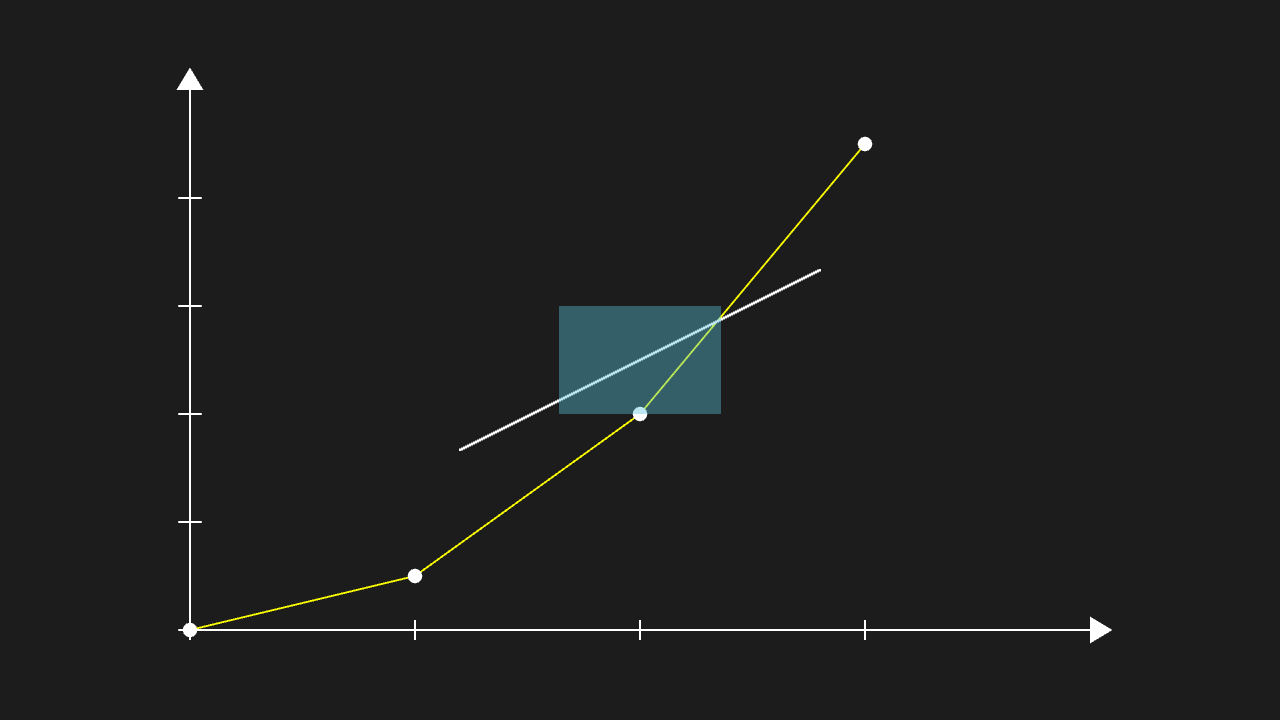
API 点名:方法面(改写 / 取几何 / 坐标映射)
方法面逐项用一遍:改样式、取几何、坐标映射的 print 断言全过,画面上标记点/线落在预期位置。
"""API 点名:方法面(改写 / 取几何 / 坐标映射)

@expect 方法面逐项用一遍:改样式、取几何、坐标映射的 print 断言全过,画面上标记点/线落在预期位置。
@note 三态表里 kind=method、state=ok 的名字点一遍。方法面最容易「表里 ok、写法不对」蒙混过关:
      manim-web 的方法名与形状并不总跟 CE 对齐(plot_line_graph 收一个选项对象、set_style 收
      camelCase 键),所以这一组把每个方法的**真实用法**写出来,靠真桥跑通来钉住。
"""

from manim import *

square = Square(side_length=1.2)
square.stretch(1.5, 0)  # 横向拉伸
square.flip(UP)  # 沿 UP 轴翻转
square.set_style(stroke_color=BLUE, fill_color=BLUE, fill_opacity=0.4)
square.align_to(Dot(point=[0, 0, 0]), UP)
square.set_x(0).set_y(0).set_z(0)
box = square.get_bounding_box()
print("api-methods-geom", len(box), round(float(square.width), 3), round(float(square.height), 3))

line = Line(start=[-2, -1, 0], end=[2, 1, 0])
print("api-methods-line", len(line.get_start()), len(line.get_end()))


def bump(_m):
    return None


dot = Dot()
dot.add_updater(bump)
print("api-methods-updaters", len(dot.get_updaters()) >= 1)
dot.remove_updater(bump)

axes = Axes(x_range=[0, 4, 1], y_range=[0, 10, 2])
curve = axes.plot(lambda x: x ** 2, x_range=[0, 3])
xy = axes.coords_to_point(1, 1)
gp = axes.input_to_graph_point(1, curve)
graph = axes.plot_line_graph([0, 1, 2, 3], [0, 1, 4, 9])
print("api-methods-axes", len(xy), len(gp), graph is not None)


class ApiMethodsScene(Scene):
    def construct(self):
        self.add(axes, graph)
        self.play(Create(square), Create(line), run_time=0.2)
        self.wait(0.2)
API 点名:形状与标记(表里 ok、语料未用到的那一批)
网格布局:每个被点名的形状占一格、格下有名字标签,互不遮挡、全部在画布内。
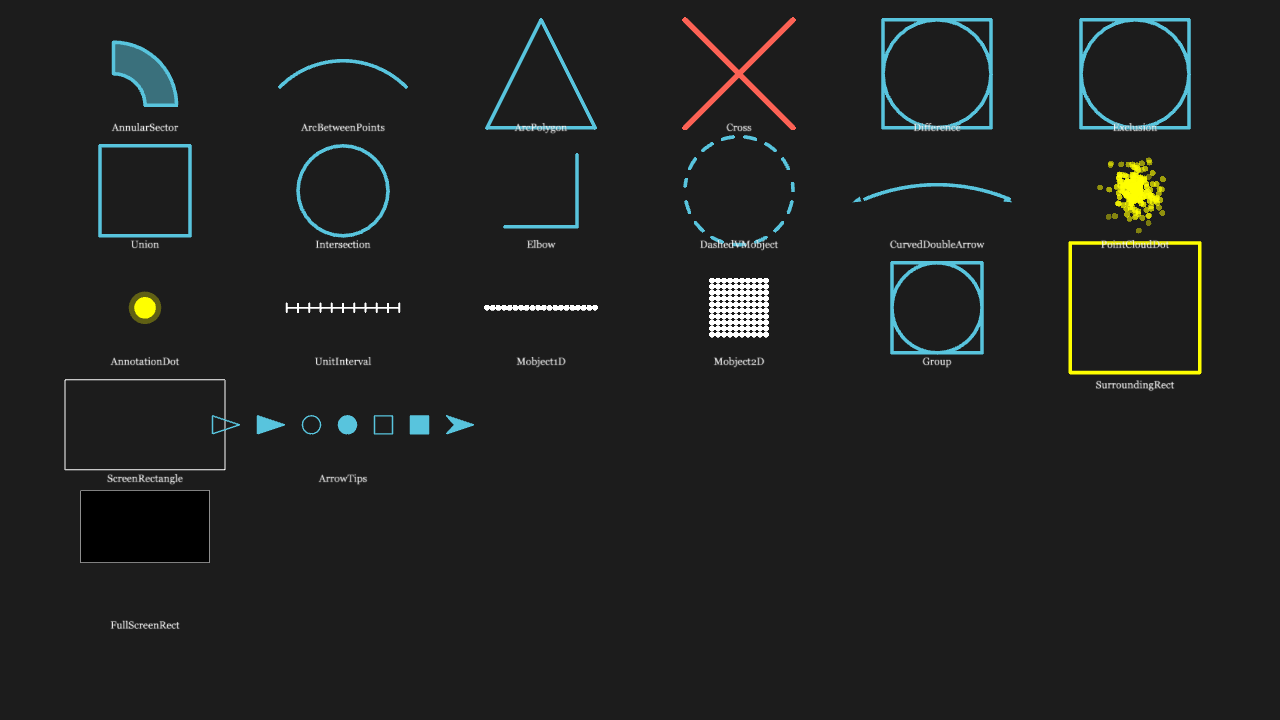
"""API 点名:形状与标记(表里 ok、语料未用到的那一批)

@expect 网格布局:每个被点名的形状占一格、格下有名字标签,互不遮挡、全部在画布内。
@note 三态表里 kind=class、state=ok 的名字点一遍。这一组只做**构造 + 加进场景**——
      形状画得对不对不是这里要管的(页面点着看),要管的是「这个名字能不能用」。
      全部对象默认叠在原点,所以逐个 move_to 到网格位;格旁标注名字,谁没显示一眼可见。
"""

from manim import *

sector = AnnularSector(inner_radius=0.5, outer_radius=1, angle=PI / 2)
arcbp = ArcBetweenPoints([-1, 0, 0], [1, 0, 0], angle=PI / 2)
arcpoly = ArcPolygon([0, 1, 0], [1, -1, 0], [-1, -1, 0])
cross = Cross(Square())
diff = Difference(Square(), Circle())
excl = Exclusion(Square(), Circle())
un = Union(Square(), Circle())
inter = Intersection(Square(), Circle())
elbow = Elbow(width=1, height=1)
dashed = DashedVMobject(Circle())
cdarrow = CurvedDoubleArrow([-2, 0, 0], [2, 0, 0])
cloud = PointCloudDot(radius=0.5, numParticles=200, particleSize=6, color=YELLOW)
mark = AnnotationDot()
unit = UnitInterval()
m1 = Mobject1D()
m2 = Mobject2D()
group = Group(Square(), Circle())
box = SurroundingRectangle(Circle())
# BackgroundRectangle:构造正常、加进场景后描边/填充怎么设都不可见(黑底黑块且描边被剥)——
# 适配层缺口,本条先删掉,由主线处理。
screen = ScreenRectangle(height=2).set_stroke(WHITE, 1)
full = FullScreenRectangle().set_stroke(WHITE, 1)  # height 参数被桥忽略,只能靠 scale 缩小

tips = VGroup(
    ArrowTip(),
    ArrowTriangleTip(),
    ArrowTriangleFilledTip(),
    ArrowCircleTip(),
    ArrowCircleFilledTip(),
    ArrowSquareTip(),
    ArrowSquareFilledTip(),
    StealthTip(),
).arrange(RIGHT, buff=0.2).set_stroke(WHITE, 1.5)  # 未填充的箭头尖默认描边太细,加白描边才看得见

# ComplexPlane / PolarPlane 挪到 14-planes.py 整幅展示:这两个类的背景网格在 manim-web 0.3.24 里
# 不受 x_length / radius_max 约束(ComplexPlane 永远铺满画布,PolarPlane 只认 size),塞不进这个网格;
# 又都不能 .scale()(scale 无条件量包围盒,无 WebGL 的回归环境直接炸 getBounds)。
complex_tracker = ComplexValueTracker(1 + 1j)

print("api-classes-2d", len(tips), len(group))

# —— 网格布局:pos(row, col) 给出格心,形状缩放进格、名字标在格下 ——
COLS = [-5.5, -3.3, -1.1, 1.1, 3.3, 5.5]
ROWS = [3.0, 1.7, 0.4, -0.9, -2.2]


def pos(row, col):
    return [COLS[col], ROWS[row], 0]


ITEMS = [
    ("AnnularSector", sector, 0.7),
    ("ArcBetweenPoints", arcbp, 0.7),
    ("ArcPolygon", arcpoly, 0.6),
    ("Cross", cross, 0.6),
    ("Difference", diff, 0.6),
    ("Exclusion", excl, 0.6),
    ("Union", un, 0.5),
    ("Intersection", inter, 0.5),
    ("Elbow", elbow, 0.8),
    ("DashedVMobject", dashed, 0.6),
    ("CurvedDoubleArrow", cdarrow, 0.4),
    ("PointCloudDot", cloud, 0.8),
    ("AnnotationDot", mark, 1.0),
    ("UnitInterval", unit, 0.25),
    ("Mobject1D", m1, 0.6),
    ("Mobject2D", m2, 0.3),
    ("Group", group, 0.5),
    ("SurroundingRect", box, 0.6),
    ("ScreenRectangle", screen, 0.5),
    ("ArrowTips", tips, 1.0),
    ("FullScreenRect", full, 0.1, (4, 0)),
]


class ApiClassesScene(Scene):
    def construct(self):
        for i, item in enumerate(ITEMS):
            name, mob, s = item[0], item[1], item[2]
            r, c = item[3] if len(item) > 3 else divmod(i, len(COLS))
            big = len(item) > 3  # 底行大件:形状上提、标签下移,都不压网格
            if s != 1.0:
                mob.scale(s)  # s=1.0 的(坐标系大件)不调 scale——manim-web 的 scale 无条件量包围盒
            mob.move_to([COLS[c], ROWS[r] + (0.35 if big else 0.18), 0])
            down = 0.75 if big else (0.68 if name == 'SurroundingRect' else 0.42)
            label = Text(name, font_size=11).move_to([COLS[c], ROWS[r] - down, 0])
            self.add(label, mob)
        self.play(Create(sector), Create(arcbp), run_time=0.2)
        self.wait(0.2)
API 点名:矩阵 / 表 / 3D / 杂项
网格布局:3D 实体一格一个(各自有颜色、有明暗立体感,不是黑块)、矩阵一行四个、杂项一行四个,格旁有名字标签,互不遮挡、全部在画布内。
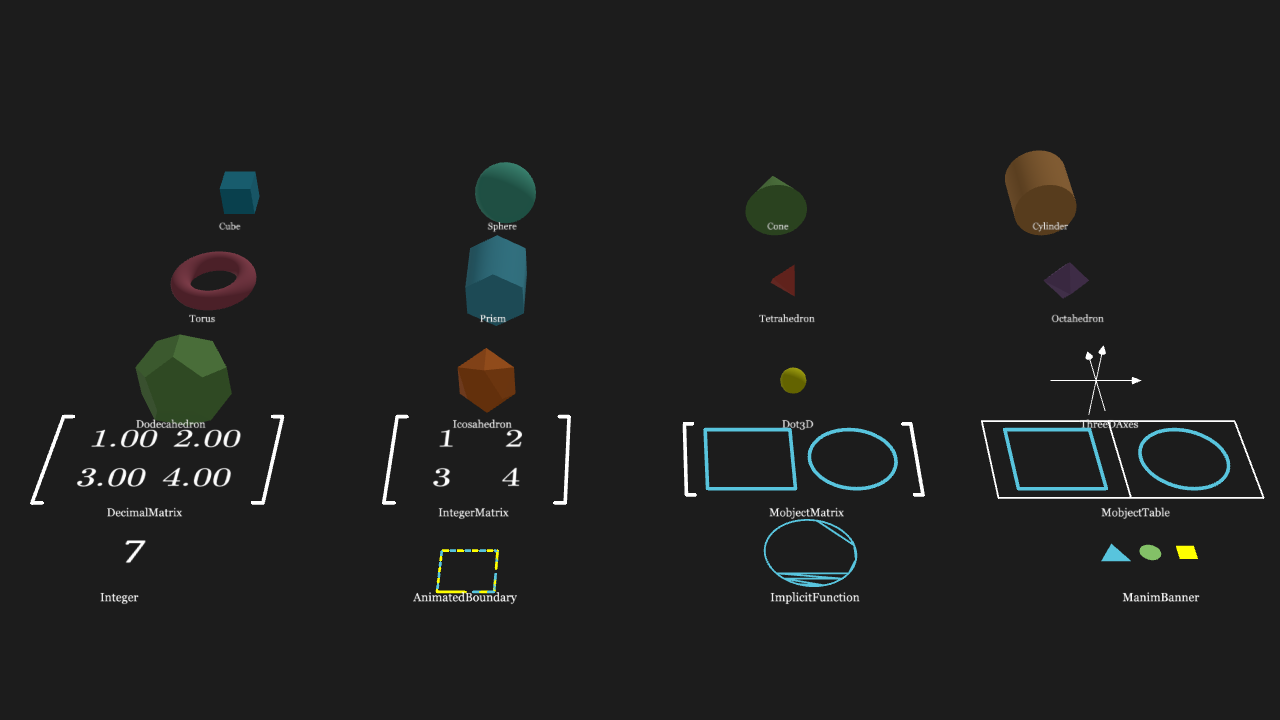
"""API 点名:矩阵 / 表 / 3D / 杂项

@expect 网格布局:3D 实体一格一个(各自有颜色、**有明暗立体感**,不是黑块)、矩阵一行四个、
        杂项一行四个,格旁有名字标签,互不遮挡、全部在画布内。
@note 同上一组:只钉「名字能用」。3D 物体默认全叠在原点,必须逐个 shift 到独立格子;
      矩阵的数字块也会叠字,错开摆放。
**3D 实体必须落在 ThreeDScene 上**:普通的 Scene 里一盏灯都没有,而 Cube / Sphere 这些用的是
吃光的材质——放错场景就是一团纯黑(曾经就是这样)。相机摆成前方俯视(phi=50°),
网格仍读得出来,同时每个实体都看得到顶面与正面(立体感就在这儿)。
实体颜色用构造参数 color=(CE 的 fill_color / fill_opacity 在 manim-web 的 3D 实体上不生效,
set_fill/set_stroke 也不是给网格用的),标签与 2D 部件一律 add_fixed_orientation_mobjects 钉住朝向——
斜视下它们不会被压扁。
"""

from manim import *

dmat = DecimalMatrix([[1.0, 2.0], [3.0, 4.0]], h_buff=2.0)  # 默认列距太窄,小数粘连
imat = IntegerMatrix([[1, 2], [3, 4]])
mmat = MobjectMatrix([[Square(), Circle()]])
mtab = MobjectTable([[Square(), Circle()]])
num = Integer(7)
boundary = AnimatedBoundary(Square())
impl = ImplicitFunction(lambda x, y: x ** 2 + y ** 2 - 1)
banner = ManimBanner()

cube = Cube(color=BLUE_D)
sphere = Sphere(color=TEAL)
cone = Cone(color=GREEN_D)
cylinder = Cylinder(color=GOLD_D)
torus = Torus(color=MAROON)
prism = Prism(color=BLUE)
tetra = Tetrahedron(color=RED_D)
octa = Octahedron(color=PURPLE)
dodeca = Dodecahedron(color=GREEN)
icosa = Icosahedron(color=ORANGE)
dot3 = Dot3D(color=YELLOW)
axes3 = ThreeDAxes(x_range=[-1, 1, 1], y_range=[-1, 1, 1], z_range=[-1, 1, 1])
vm3 = ThreeDVMobject()  # 空几何,不进画面

print("api-classes-3d", mmat is not None, mtab is not None, impl is not None, banner is not None)

# —— 网格布局 ——
COLS4 = [-5.0, -1.68, 1.68, 5.0]
SOLID_ROWS = [3.25, 1.45, -0.35]  # 俯视会把 y 压扁,行距比 2D 版拉开一些
MAT_Y = -1.6
MISC_Y = -3.1


class ApiStructuresScene(ThreeDScene):
    def construct(self):
        # 前方俯视:theta=-90° 让 x 轴正对镜头(网格不变形),phi=50° 让实体露出顶面。
        self.set_camera_orientation(phi=50 * DEGREES, theta=-90 * DEGREES)

        fixed = []  # 标签与 2D 部件:钉住朝向,斜视下才不会被压扁

        solids = [
            ("Cube", cube, 0.38), ("Sphere", sphere, 0.38), ("Cone", cone, 0.38),
            ("Cylinder", cylinder, 0.38),
            ("Torus", torus, 0.38), ("Prism", prism, 0.38), ("Tetrahedron", tetra, 0.38),
            ("Octahedron", octa, 0.38),
            ("Dodecahedron", dodeca, 0.38), ("Icosahedron", icosa, 0.38), ("Dot3D", dot3, 1.8),
            ("ThreeDAxes", axes3, 0.5),  # 轴默认横跨画布,缩到格内
        ]
        for i, (name, mob, s) in enumerate(solids):
            r, c = divmod(i, len(COLS4))
            mob.scale(s).shift([COLS4[c], SOLID_ROWS[r], 0])
            fixed.append(Text(name, font_size=11).move_to([COLS4[c], SOLID_ROWS[r] - 0.72, 0]))
            self.add(mob)

        mats = [
            ("DecimalMatrix", dmat), ("IntegerMatrix", imat),
            ("MobjectMatrix", mmat), ("MobjectTable", mtab),
        ]
        for i, (name, mob) in enumerate(mats):
            s = 0.8 if i < 2 else 0.45  # 装实体的矩阵/表天生太宽,缩得更小
            mob.scale(s).move_to([COLS4[i], MAT_Y, 0])
            fixed.append(Text(name, font_size=11).move_to([COLS4[i], MAT_Y - 0.8, 0]))
            self.add(mob)

        misc = [
            ("Integer", num, 1.0), ("AnimatedBoundary", boundary, 0.25),
            ("ImplicitFunction", impl, 0.45), ("ManimBanner", banner, 0.3),
        ]
        for i, (name, mob, s) in enumerate(misc):
            dy = -0.25 if name == "AnimatedBoundary" else 0.0
            mob.scale(s).move_to([COLS4[i], MISC_Y + 0.15 + dy, 0])
            fixed.append(Text(name, font_size=11).move_to([COLS4[i], MISC_Y - 0.45, 0]))
            self.add(mob)

        # 标签 + 矩阵 / 表 / 杂项(都是 2D 部件):一律钉住朝向,斜视下不压扁、正对观众。
        self.add_fixed_orientation_mobjects(*fixed)

        self.play(Write(dmat), run_time=0.2)
        self.wait(0.2)
API 点名:场景家族
一个蓝色的立方体斜立在画面中心:能看到顶面与两个侧面、明暗不同(真 3D 场景,有光照有深度);画面下缘钉着一行白字 "ThreeDScene ok"——它不跟相机转、也不会被斜视压扁。
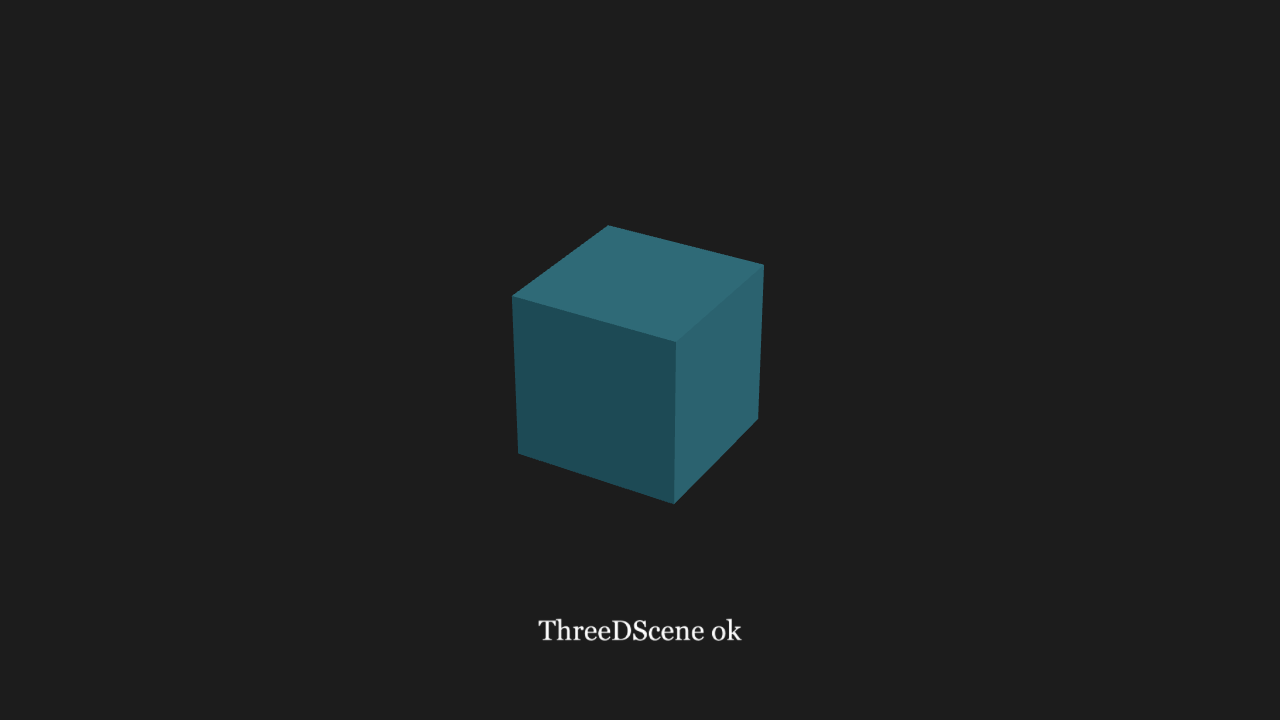
"""API 点名:场景家族

@expect 一个蓝色的立方体斜立在画面中心:能看到顶面与两个侧面、明暗不同(真 3D 场景,
        有光照有深度);画面下缘钉着一行白字 "ThreeDScene ok"——它不跟相机转、也不会被斜视压扁。
@note 场景家族在适配层里**各自是真子类**:ThreeDScene 拿到的是 manim-web 的真 3D 场景
      (3D 相机 / 光照 / 深度测试),其余几个共用同一块画布、只换相机语义。
      GraphScene 是唯一的例外——manim-web 没有这个类(CE 0.22 的公共 API 里也没有,
      那是 ManimGL 的写法),退回 2D 的 Scene 并打印一行 warn。
      本文件定义了 7 个场景类,但**只有第一个会真跑**(运行器只驱动第一个 Scene 子类):
      其余几个的价值是「类创建时就把基类名字解析掉了」——名字写错会当场 NameError,
      钉住「表里 ok 的场景名真能继承」。
"""

from manim import *


class ApiSceneFamily(ThreeDScene):
    def construct(self):
        self.set_camera_orientation(phi=60 * DEGREES, theta=-60 * DEGREES)
        badge = Text("ThreeDScene ok", font_size=30)
        badge.to_edge(DOWN, buff=0.8)
        # 钉在屏幕上(这调用自身也会把物体加进场景,见 shim 的注释)
        self.add_fixed_in_frame_mobjects(badge)
        self.add(Cube(side_length=2, color=BLUE))
        self.wait(0.1)


def _marker(label):
    return VGroup(
        Square(side_length=1.6, color=BLUE),
        Text(label, font_size=26, color=WHITE),
    )


# —— 以下六个只做「基类名字解析得到」的点名,construct 不会被执行(见 @note)——


class _FamilyMovingCamera(MovingCameraScene):
    def construct(self):
        self.add(_marker("MovingCamera ok"))


class _FamilyZoomed(ZoomedScene):
    def construct(self):
        self.add(_marker("ZoomedScene ok"))


class _FamilyVector(VectorScene):
    def construct(self):
        self.add(_marker("VectorScene ok"))


class _FamilyLinear(LinearTransformationScene):
    def construct(self):
        self.add(_marker("LinearTransform ok"))


class _FamilyGraph(GraphScene):  # manim-web 没有,退回 2D 的 Scene 并 warn
    def construct(self):
        self.add(_marker("GraphScene→Scene"))
API 点名:动画面(表里 ok、语料未用到的那一批)
动画面逐支播完:每支动画都有可辨识的效果、不炸、不卡死渲染循环。
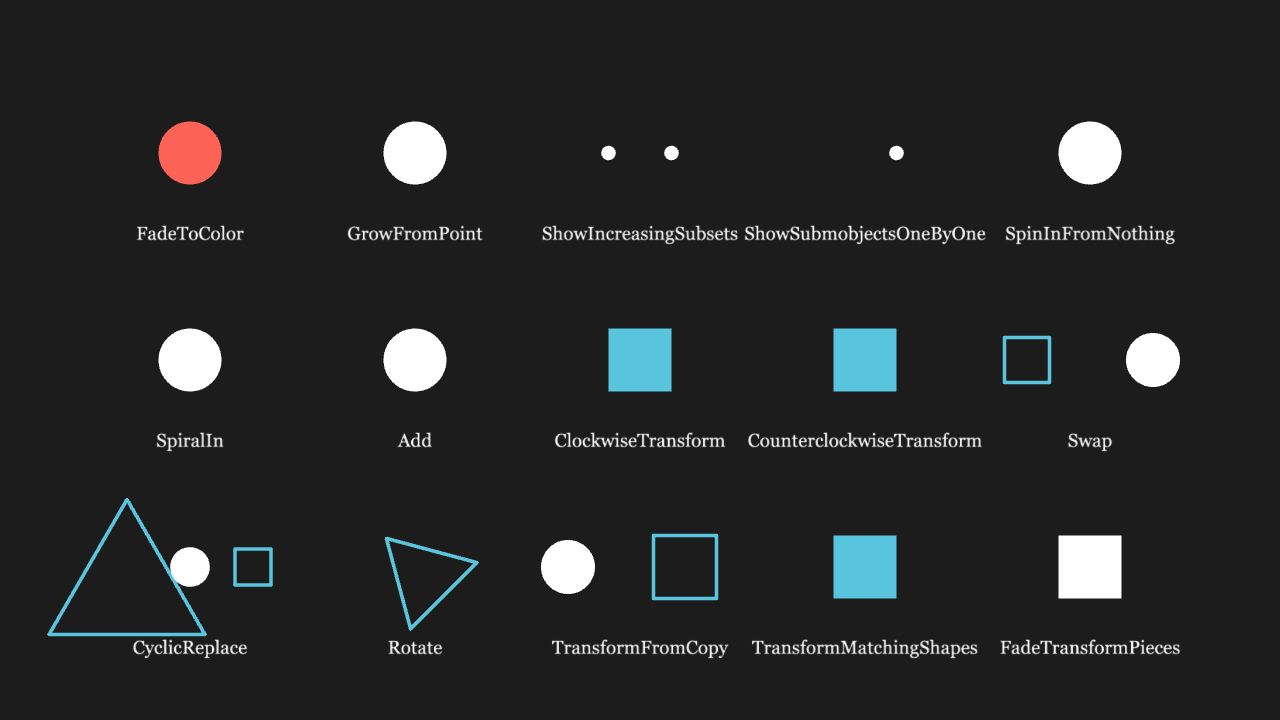
"""API 点名:动画面(表里 ok、语料未用到的那一批)

@expect 动画面逐支播完:每支动画都有可辨识的效果、不炸、不卡死渲染循环。
@note 三态表里 kind=anim、state=ok 的名字点一遍。动画的名字与「要几个目标、收什么参数」
      差别很大(Transform 两个、Rotate 带角度、CyclicReplace 收一个列表),所以一条一条写出来,
      靠真桥跑通钉住——写错名字或形状会当场报错。
      留痕支(播完在场景里留下可辨识终态的)排进网格位,格下标名字;纯过程支
      (Blink / Broadcast / FocusOn / ShowPassingFlash / ShowPassingFlashWithThinningStrokeWidth /
      ShrinkToCenter / Uncreate / Wiggle / ApplyWave / Succession / Unwrite)不留终态、
      静态终帧无从核对,照播但播完把被 play 收养回场景的目标请走——要观察过程得 --realtime 跑。
"""

from manim import *

COLS = [-5, -2.5, 0, 2.5, 5]
ROWS = [2.3, 0, -2.3]


def cell(r, c):
    return [COLS[c], ROWS[r], 0]


def off(base, dx, dy):
    return [base[0] + dx, base[1] + dy, 0]


class ApiAnimsScene(Scene):
    def construct(self):
        # —— 留痕支:先落格再播,终帧每格有痕迹 ——
        # FadeToColor:换色的点留在格里
        d = Dot(radius=0.35).move_to(cell(0, 0))
        self.play(FadeToColor(d, RED), run_time=0.05)
        self.add(Text("FadeToColor", font_size=20).move_to(off(cell(0, 0), 0, -0.9)))
        # GrowFromPoint:从原点长到位
        d = Dot(radius=0.35).move_to(cell(0, 1))
        self.play(GrowFromPoint(d, ORIGIN), run_time=0.05)
        self.add(Text("GrowFromPoint", font_size=20).move_to(off(cell(0, 1), 0, -0.9)))
        # ShowIncreasingSubsets:逐个亮出,终态是两个点都在
        g = VGroup(Dot().move_to(off(cell(0, 2), -0.35, 0)), Dot().move_to(off(cell(0, 2), 0.35, 0)))
        self.play(ShowIncreasingSubsets(g), run_time=0.05)
        self.add(Text("ShowIncreasingSubsets", font_size=20).move_to(off(cell(0, 2), 0, -0.9)))
        # ShowSubmobjectsOneByOne:逐个子物体亮出
        g = VGroup(Dot().move_to(off(cell(0, 3), -0.35, 0)), Dot().move_to(off(cell(0, 3), 0.35, 0)))
        self.play(ShowSubmobjectsOneByOne(g), run_time=0.05)
        self.add(Text("ShowSubmobjectsOneByOne", font_size=20).move_to(off(cell(0, 3), 0, -0.9)))
        # SpinInFromNothing:旋着进场,落在格里
        d = Dot(radius=0.35).move_to(cell(0, 4))
        self.play(SpinInFromNothing(d), run_time=0.05)
        self.add(Text("SpinInFromNothing", font_size=20).move_to(off(cell(0, 4), 0, -0.9)))
        # SpiralIn:螺旋进场
        d = Dot(radius=0.35).move_to(cell(1, 0))
        self.play(SpiralIn(d), run_time=0.05)
        self.add(Text("SpiralIn", font_size=20).move_to(off(cell(1, 0), 0, -0.9)))
        # Add:直接加进场景
        d = Dot(radius=0.35).move_to(cell(1, 1))
        self.play(Add(d), run_time=0.05)
        self.add(Text("Add", font_size=20).move_to(off(cell(1, 1), 0, -0.9)))
        # ClockwiseTransform:点变方,终态是方
        d = Dot(radius=0.3).move_to(cell(1, 2))
        sq = Square(side_length=0.7).move_to(cell(1, 2))
        self.play(ClockwiseTransform(d, sq), run_time=0.05)
        self.add(Text("ClockwiseTransform", font_size=20).move_to(off(cell(1, 2), 0, -0.9)))
        # CounterclockwiseTransform:同上反向
        d = Dot(radius=0.3).move_to(cell(1, 3))
        sq = Square(side_length=0.7).move_to(cell(1, 3))
        self.play(CounterclockwiseTransform(d, sq), run_time=0.05)
        self.add(Text("CounterclockwiseTransform", font_size=20).move_to(off(cell(1, 3), 0, -0.9)))
        # Swap:两个物体换位,终态两物体都在。
        # 桥的 play 只收养动画主目标,多目标动画(Swap / CyclicReplace)其余目标要预 add 进场景
        a = Dot(radius=0.3).move_to(off(cell(1, 4), -0.7, 0))
        b = Square(side_length=0.5).move_to(off(cell(1, 4), 0.7, 0))
        self.add(a, b)
        self.play(Swap(a, b), run_time=0.05)
        self.add(Text("Swap", font_size=20).move_to(off(cell(1, 4), 0, -0.9)))
        # CyclicReplace:三个物体轮换位置(多目标,同上预 add)
        a = Dot(radius=0.22).move_to(off(cell(2, 0), -0.7, 0))
        b = Square(side_length=0.4).move_to(cell(2, 0))
        c = Triangle().move_to(off(cell(2, 0), 0.7, 0))
        self.add(a, b, c)
        self.play(CyclicReplace(a, b, c), run_time=0.05)
        self.add(Text("CyclicReplace", font_size=20).move_to(off(cell(2, 0), 0, -0.9)))
        # Rotate:三角转 45°,终态是转过的三角
        t = Triangle().move_to(cell(2, 1)).scale(0.6)
        self.play(Rotate(t, PI / 4), run_time=0.05)
        self.add(Text("Rotate", font_size=20).move_to(off(cell(2, 1), 0, -0.9)))
        # TransformFromCopy:复制源点变方(源的副本落格,源本体预 add 留在旁作对照)
        d = Dot(radius=0.3).move_to(off(cell(2, 2), -0.8, 0))
        sq = Square(side_length=0.7).move_to(off(cell(2, 2), 0.5, 0))
        self.add(d)
        self.play(TransformFromCopy(d, sq), run_time=0.05)
        self.add(Text("TransformFromCopy", font_size=20).move_to(off(cell(2, 2), 0, -0.9)))
        # TransformMatchingShapes:点变方
        d = Dot(radius=0.3).move_to(cell(2, 3))
        sq = Square(side_length=0.7).move_to(cell(2, 3))
        self.play(TransformMatchingShapes(d, sq), run_time=0.05)
        self.add(Text("TransformMatchingShapes", font_size=20).move_to(off(cell(2, 3), 0, -0.9)))
        # FadeTransformPieces:淡入淡出换件
        d = Dot(radius=0.3).move_to(cell(2, 4))
        sq = Square(side_length=0.7).move_to(cell(2, 4))
        self.play(FadeTransformPieces(d, sq), run_time=0.05)
        self.add(Text("FadeTransformPieces", font_size=20).move_to(off(cell(2, 4), 0, -0.9)))

        # —— 纯过程支:照播钉住「名字能用」,播完把被收养回场景的目标请走(见 @note)——
        d = Dot(radius=0.3)
        self.play(Blink(d), run_time=0.05)
        self.remove(d)
        d = Dot(radius=0.3)
        self.play(Broadcast(d), run_time=0.05)
        self.remove(d)
        d = Dot(radius=0.3)
        self.play(FocusOn(d), run_time=0.05)
        self.remove(d)
        c = Circle(radius=0.3)
        self.play(ShowPassingFlash(c), run_time=0.05)
        self.remove(c)
        c = Circle(radius=0.3)
        self.play(ShowPassingFlashWithThinningStrokeWidth(c), run_time=0.05)
        self.remove(c)
        d = Dot(radius=0.3)
        self.play(ShrinkToCenter(d), run_time=0.05)
        self.remove(d)
        c = Circle(radius=0.3)
        self.play(Uncreate(c), run_time=0.05)
        self.remove(c)
        d = Dot(radius=0.3)
        self.play(Wiggle(d), run_time=0.05)
        self.remove(d)
        sq = Square(side_length=0.7)
        self.play(ApplyWave(sq), run_time=0.05)
        self.remove(sq)
        d = Dot(radius=0.3)
        self.play(Succession(Create(d), FadeOut(d)), run_time=0.05)
        self.remove(d)
        t = Text("hi")
        self.play(Unwrite(t), run_time=0.05)
        self.remove(t)
        self.wait(0.2)
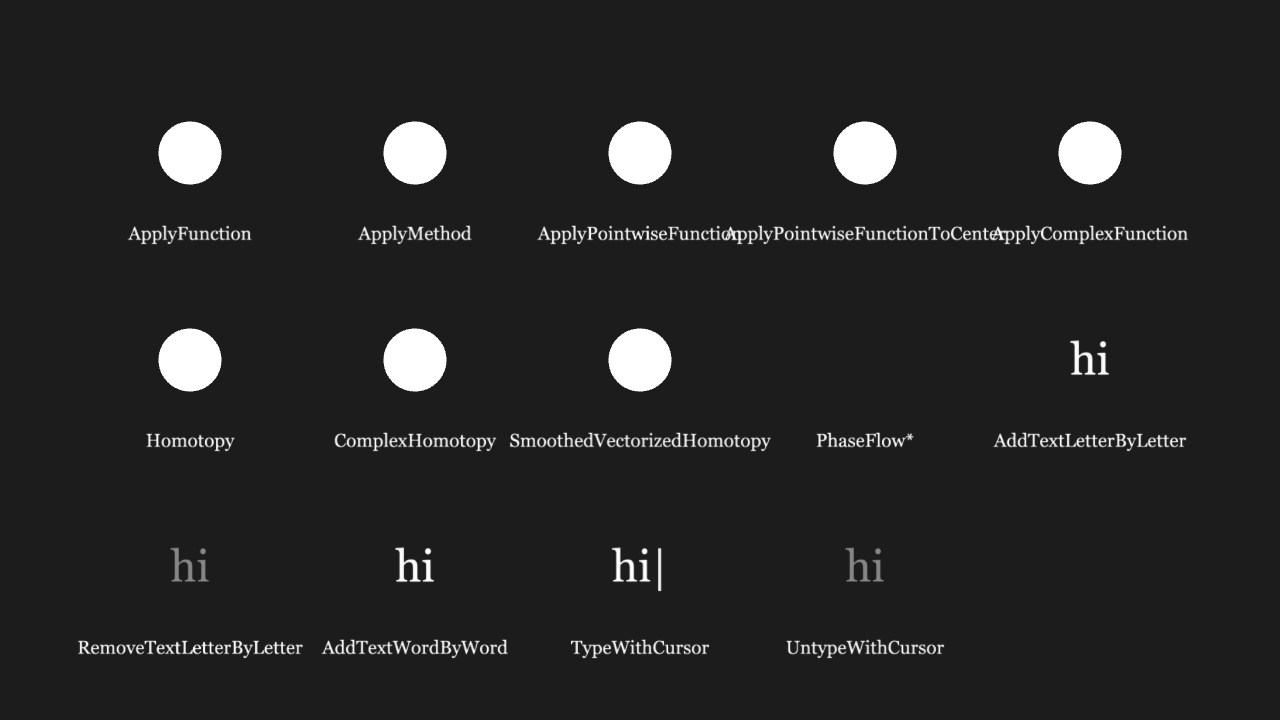
API 点名:动画面(函数 / 文字 / 包装那一批)
函数/文字/包装类动画逐支播完:回调真的被调、文字逐字出现等效果可辨识。
"""API 点名:动画面(函数 / 文字 / 包装那一批)

@expect 函数/文字/包装类动画逐支播完:回调真的被调、文字逐字出现等效果可辨识。
@note 这几个把**回调**交给动画(ApplyFunction / Homotopy / ApplyMethod 这类),或针对文字
      (TypeWithCursor)。回调从 Python 过桥是 PyProxy,能被 JS 调用——真机跑通才算数。
      逐支落格、格下标名字,终帧每格有痕迹。适配层缺口:ApplyMethod 的方法参数过桥不完整——
      "shift" 插值得 NaN(渲染空白)、"scale" 报 spread 迭代错、"move_to" 名字跑通但不位移;
      这支先按 "move_to" 点名(物体在格内可见),方法效果待桥修复后补验。
      RemoveTextLetterByLetter / UntypeWithCursor 终态是删完,垫灰字作对照。
      另一缺口:PhaseFlow 过 PyProxy 回调后几何被污染——恒等同伦也会把物体位移/放大
      (y 向漂出 e 量级、宽度涨到 ~1.9),终态无从留痕,播完把被污染的物体请走。
"""

from manim import *

COLS = [-5, -2.5, 0, 2.5, 5]
ROWS = [2.3, 0, -2.3]


def cell(r, c):
    return [COLS[c], ROWS[r], 0]


def off(base, dx, dy):
    return [base[0] + dx, base[1] + dy, 0]


class ApiAnimsFuncScene(Scene):
    def construct(self):
        # —— 函数/回调支:恒等回调,点留在格里 ——
        d = Dot(radius=0.35).move_to(cell(0, 0))
        self.play(ApplyFunction(lambda m: m, d), run_time=0.05)
        self.add(Text("ApplyFunction", font_size=20).move_to(off(cell(0, 0), 0, -0.9)))
        # ApplyMethod:见 @note——"shift"/"scale" 过桥有缺口,用 "move_to" 点名
        d = Dot(radius=0.35).move_to(cell(0, 1))
        self.add(d)
        self.play(ApplyMethod(d, "move_to", off(cell(0, 1), 0.4, 0)), run_time=0.05)
        self.add(Text("ApplyMethod", font_size=20).move_to(off(cell(0, 1), 0, -0.9)))
        d = Dot(radius=0.35).move_to(cell(0, 2))
        self.play(ApplyPointwiseFunction(lambda p: p, d), run_time=0.05)
        self.add(Text("ApplyPointwiseFunction", font_size=20).move_to(off(cell(0, 2), 0, -0.9)))
        d = Dot(radius=0.35).move_to(cell(0, 3))
        self.play(ApplyPointwiseFunctionToCenter(lambda p: p, d), run_time=0.05)
        self.add(Text("ApplyPointwiseFunctionToCenter", font_size=20).move_to(off(cell(0, 3), 0, -0.9)))
        d = Dot(radius=0.35).move_to(cell(0, 4))
        self.play(ApplyComplexFunction(lambda z: z, d), run_time=0.05)
        self.add(Text("ApplyComplexFunction", font_size=20).move_to(off(cell(0, 4), 0, -0.9)))
        # —— homotopy 支:恒等同伦,点留在格里(PhaseFlow 会把点撑大,独占一格不碍邻格)——
        d = Dot(radius=0.35).move_to(cell(1, 0))
        self.play(Homotopy(lambda x, y, z, t: [x, y, z], d), run_time=0.05)
        self.add(Text("Homotopy", font_size=20).move_to(off(cell(1, 0), 0, -0.9)))
        d = Dot(radius=0.35).move_to(cell(1, 1))
        self.play(ComplexHomotopy(lambda z, t: z, d), run_time=0.05)
        self.add(Text("ComplexHomotopy", font_size=20).move_to(off(cell(1, 1), 0, -0.9)))
        d = Dot(radius=0.35).move_to(cell(1, 2))
        self.play(SmoothedVectorizedHomotopy(lambda x, y, z, t: [x, y, z], d), run_time=0.05)
        self.add(Text("SmoothedVectorizedHomotopy", font_size=20).move_to(off(cell(1, 2), 0, -0.9)))
        d = Dot(radius=0.35).move_to(cell(1, 3))
        self.play(PhaseFlow(lambda p: p, d), run_time=0.05)
        self.remove(d)  # 见 @note:PhaseFlow 过桥污染几何,终态不留痕
        self.add(Text("PhaseFlow*", font_size=20).move_to(off(cell(1, 3), 0, -0.9)))
        # —— 文字支:垫灰字作对照,白字落在灰字上 ——
        ghost = Text("hi", color=GREY).move_to(cell(1, 4))
        self.add(ghost)
        t = Text("hi").move_to(cell(1, 4))
        self.play(AddTextLetterByLetter(t), run_time=0.05)
        self.add(Text("AddTextLetterByLetter", font_size=20).move_to(off(cell(1, 4), 0, -0.9)))
        ghost = Text("hi", color=GREY).move_to(cell(2, 0))
        self.add(ghost)
        t = Text("hi").move_to(cell(2, 0))
        self.play(RemoveTextLetterByLetter(t), run_time=0.05)
        self.add(Text("RemoveTextLetterByLetter", font_size=20).move_to(off(cell(2, 0), 0, -0.9)))
        ghost = Text("hi", color=GREY).move_to(cell(2, 1))
        self.add(ghost)
        t = Text("hi").move_to(cell(2, 1))
        self.play(AddTextWordByWord(t), run_time=0.05)
        self.add(Text("AddTextWordByWord", font_size=20).move_to(off(cell(2, 1), 0, -0.9)))
        t = Text("hi").move_to(cell(2, 2))
        self.play(TypeWithCursor(t), run_time=0.05)
        self.add(Text("TypeWithCursor", font_size=20).move_to(off(cell(2, 2), 0, -0.9)))
        ghost = Text("hi", color=GREY).move_to(cell(2, 3))
        self.add(ghost)
        t = Text("hi").move_to(cell(2, 3))
        self.play(UntypeWithCursor(t), run_time=0.05)
        self.add(Text("UntypeWithCursor", font_size=20).move_to(off(cell(2, 3), 0, -0.9)))
        self.wait(0.2)
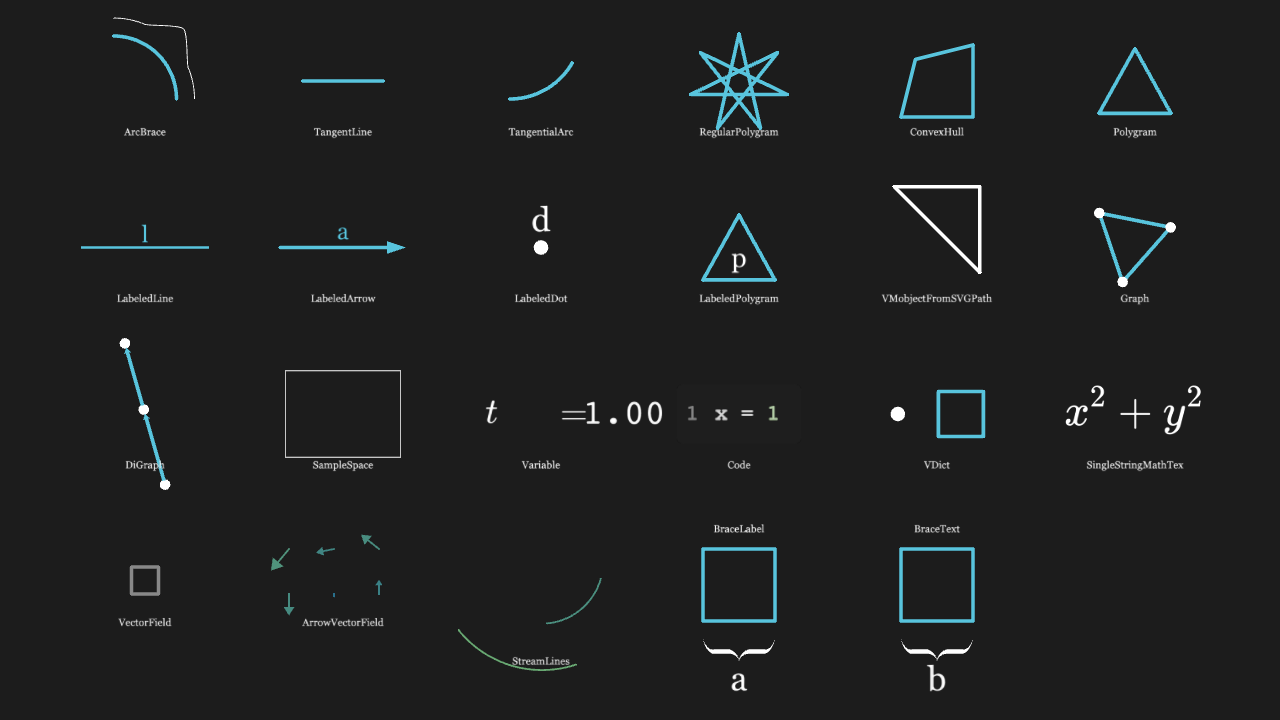
API 点名:形状 / 标记 / 图(表里 ok、语料此前没点到的那一批)
四行网格(每行六格,末行五格):每个被点名的类占一格、格下有名字标签;依赖簇(弧+弧括号、方块+括号)成组摆放;互不遮挡、全部在画布内。
"""API 点名:形状 / 标记 / 图(表里 ok、语料此前没点到的那一批)

@expect 四行网格(每行六格,末行五格):每个被点名的类占一格、格下有名字标签;
        依赖簇(弧+弧括号、方块+括号)成组摆放;互不遮挡、全部在画布内。
@note 这些类 manim-web 都有,只是构造姿势与 CE 不同(CE 收位置参数、manim-web 多收一个选项对象)——
      在 surface.ts 的 CTOR 里逐个登记了配方。全部对象默认叠在原点,必须逐格摆放;
      MathTex 一支只敢用 move_to 定位。
      场类缺口:manim-web 0.3.24 的 VectorField._regenerate() 是空的(抽象基类,只有
      ArrowVectorField / StreamLines 生成可见物)——名字能构造但画不出东西,格内放灰方块作
      格位参照;ArrowVectorField / StreamLines 的线箭头按场走会越出采样范围,范围与步长收紧
      (步长 ×0.8 封顶箭头长)才不侵入上排 Variable / Code。
      2026-10-11:原先末行的 Line3D / Arrow3D / ConvexHull3D 撤出本文件——它们吃光,
      在普通的 Scene 里是黑块,已挪进 `api/12-classes-3d-extra.py` 的真 ThreeDScene。
"""

from manim import *

COLS = [-5.5, -3.3, -1.1, 1.1, 3.3, 5.5]
ROWS = [2.95, 1.1, -0.75, -2.6]


def cell(r, c, dy=0.15):
    return [COLS[c], ROWS[r] + dy, 0]


def label_at(r, c, text, dy=-0.42):
    return Text(text, font_size=11).move_to([COLS[c], ROWS[r] + dy, 0])


class ExtraClassesScene(Scene):
    def construct(self):
        # —— 行 0:切线 / 切弧 / 多角星 / 凸包 / 多角形 ——
        arc = Arc(radius=0.7, start_angle=0, angle=PI / 2).move_to(cell(0, 0, 0.3))
        self.add(label_at(0, 0, "ArcBrace"), ArcBrace(arc), arc)

        tline = TangentLine(Circle(radius=1), 0.25).scale(0.45).move_to(cell(0, 1))
        self.add(label_at(0, 1, "TangentLine"), tline)

        tarc = TangentialArc(ORIGIN, RIGHT, radius=1, angle=PI / 3).scale(0.8).move_to(cell(0, 2))
        self.add(label_at(0, 2, "TangentialArc"), tarc)

        polygram7 = RegularPolygram(7, density=3).scale(0.55).move_to(cell(0, 3))
        self.add(label_at(0, 3, "RegularPolygram"), polygram7)

        hull = ConvexHull([[0, 0, 0], [1, 0, 0], [1, 1, 0], [0.2, 0.8, 0]]).scale(0.8).move_to(cell(0, 4))
        self.add(label_at(0, 4, "ConvexHull"), hull)

        pg = Polygram([[[0, 0, 0], [1, 0, 0], [0.5, 0.9, 0]]]).scale(0.8).move_to(cell(0, 5))
        self.add(label_at(0, 5, "Polygram"), pg)

        # —— 行 1:带标签的线 / 箭头 / 点 / 多角形;SVG 路径;图 ——
        lline = LabeledLine(start=LEFT, end=RIGHT, label="l").scale(0.7).move_to(cell(1, 0))
        self.add(label_at(1, 0, "LabeledLine"), lline)

        larrow = LabeledArrow(start=LEFT, end=RIGHT, label="a").scale(0.7).move_to(cell(1, 1))
        self.add(label_at(1, 1, "LabeledArrow"), larrow)

        ldot = LabeledDot(point=ORIGIN, label="d").move_to(cell(1, 2))
        self.add(label_at(1, 2, "LabeledDot"), ldot)

        lpg = LabeledPolygram(vertex_groups=[[[0, 0, 0], [1, 0, 0], [0.5, 0.9, 0]]], label="p")
        lpg.scale(0.8).move_to(cell(1, 3))
        self.add(label_at(1, 3, "LabeledPolygram"), lpg)

        svgp = VMobjectFromSVGPath(path_data="M0,0 L1,0 L1,1 Z").scale(0.95).move_to(cell(1, 4, 0.35))
        self.add(label_at(1, 4, "VMobjectFromSVGPath"), svgp)

        graph = Graph(vertices=[1, 2, 3], edges=[(1, 2), (2, 3), (3, 1)]).scale(0.32).move_to(cell(1, 5))
        self.add(label_at(1, 5, "Graph"), graph)

        # —— 行 2:有向图 / 样本空间 / 变量 / 代码块 / 名字表 / 公式 ——
        digraph = DiGraph(vertices=[1, 2, 3], edges=[(1, 2), (2, 3)]).scale(0.32).move_to(cell(2, 0))
        self.add(label_at(2, 0, "DiGraph"), digraph)

        space = SampleSpace(width=4, height=3).scale(0.32).move_to(cell(2, 1))
        space.set_stroke(WHITE, 1)  # 内圈椭圆默认黑填充,加白描边才看得见结构
        self.add(label_at(2, 1, "SampleSpace"), space)

        var = Variable(label="t", value=1).scale(0.8).move_to(cell(2, 2))
        self.add(label_at(2, 2, "Variable"), var)

        code = Code(code="x = 1", language="python").scale(1.0).move_to(cell(2, 3))
        self.add(label_at(2, 3, "Code"), code)

        vd = VDict({"a": Dot().shift(LEFT * 0.35), "b": Square(side_length=0.5).shift(RIGHT * 0.35)})
        vd.move_to(cell(2, 4))
        self.add(label_at(2, 4, "VDict"), vd)

        smtex = SingleStringMathTex("x^2 + y^2").move_to(cell(2, 5))  # MathTex 只用 move_to 定位
        self.add(label_at(2, 5, "SingleStringMathTex"), smtex)

        # —— 行 3:向量场三兄弟 + 两个括号簇(底行下方留白,垂下来的括号不压人)——
        # PGroup(点云类)在桥上不渲染,已删并由主线处理。

        def cell_field(cx, cy):
            # 方向场绕格心旋、幅度压到 0.4——箭头长度随场幅走,不压就伸出格子
            return lambda p: [-(p[1] - cy) * 0.4, (p[0] - cx) * 0.4, 0]

        cx, cy = COLS[0], ROWS[3]
        vfield = VectorField(
            cell_field(cx, cy), x_range=[cx - 1, cx + 1, 1], y_range=[cy - 0.35, cy + 0.75, 1],
        )
        # VectorField 上游不生成可见物(见 @note)——灰方块只标格位,不是它的渲染结果
        self.add(label_at(3, 0, "VectorField", -0.32), Square(side_length=0.3, color=GREY).move_to(cell(3, 0)), vfield)

        ax, ay = COLS[1], ROWS[3]
        afield = ArrowVectorField(
            cell_field(ax, ay), x_range=[ax - 0.6, ax + 0.6, 0.5], y_range=[ay, ay + 0.55, 0.5],
            length_func=lambda norm: min(norm, 0.2),  # 箭头压短,可见簇整体缩在格上半区,让开格下标签
        )
        self.add(label_at(3, 1, "ArrowVectorField", -0.32), afield)

        sx, sy = COLS[2], ROWS[3] + 0.35
        stream = StreamLines(
            cell_field(sx, sy), x_range=[sx - 0.8, sx + 0.8, 1], y_range=[sy - 0.5, sy + 0.3, 1],
            num_lines=4,
        )
        self.add(label_at(3, 2, "StreamLines", -0.75), stream)

        sq1 = Square(side_length=0.8).move_to(cell(3, 3, 0.1))
        # 名签放方块上方:括号+文字在方块下垂 ~0.8,下方是 "a"/"b" 的位置
        self.add(label_at(3, 3, "BraceLabel", 0.72), BraceLabel(sq1, "a"), sq1)

        sq2 = Square(side_length=0.8).move_to(cell(3, 4, 0.1))
        self.add(label_at(3, 4, "BraceText", 0.72), BraceText(sq2, "b"), sq2)

        self.wait(0.2)
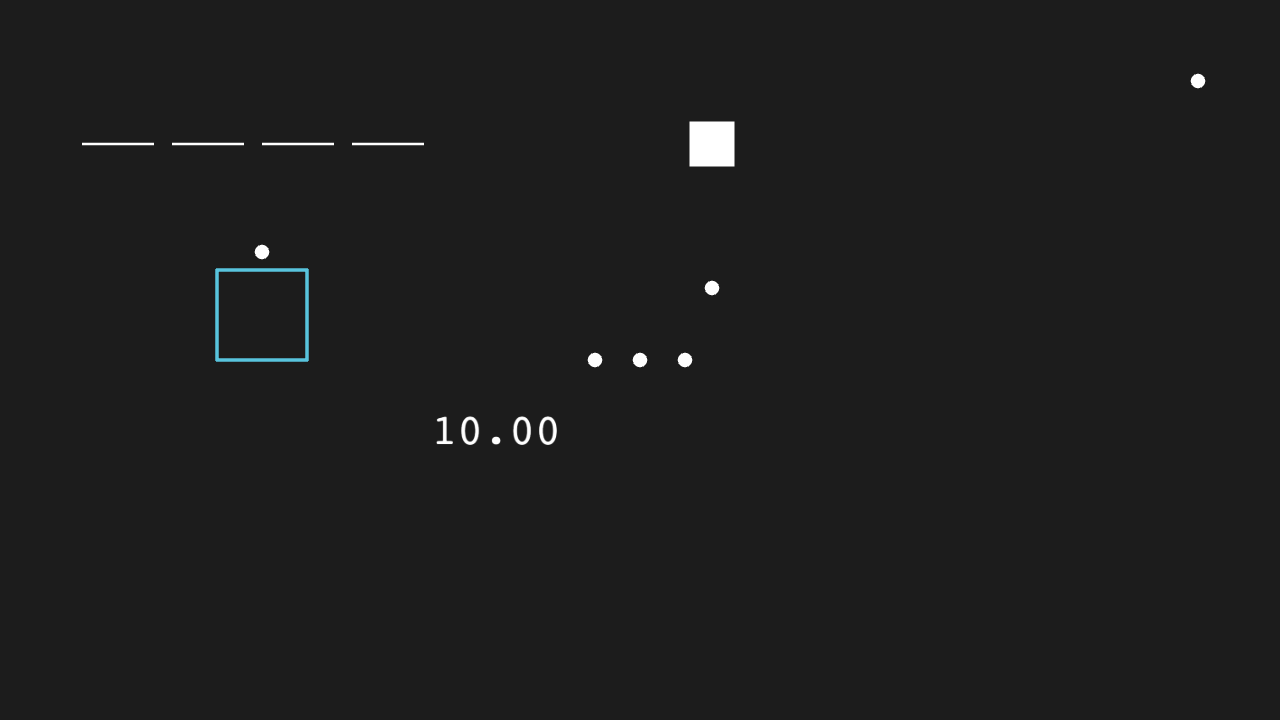
API 点名:动画补遗(表里 ok、语料此前没点到的那一批)
这批动画各播一次、对象各占一处互不遮挡:线段露出中段、方块回到存过的样子、圆点搬到上方目标位、三颗点依次入场、数字走到 10.00、点变方、单颗点在场。全部在画布内。
"""API 点名:动画补遗(表里 ok、语料此前没点到的那一批)

@expect 这批动画各播一次、对象各占一处互不遮挡:线段露出中段、方块回到存过的样子、
        圆点搬到上方目标位、三颗点依次入场、数字走到 10.00、点变方、单颗点在场。全部在画布内。
@note 第五轮补齐。这几支在 manim-web 上的形状与 CE 差得最远,各接了一处:
      Wait 是场景方法、LaggedStartMap 收动画**类**、ChangeSpeed 收速度**函数**、
      ChangingDecimal 的 f(t) 表达不了——都落在适配层与判定层(见 manim-shim.ts / surface.ts)。
      所有对象默认叠在原点,逐个 shift 到独立位置(数字与方块错开)。
"""

from manim import *


class ExtraAnimsScene(Scene):
    def construct(self):
        # ShowPartial:只露出路径的一段(CE 给两个位置比例,manim-web 收选项)
        line = Line(LEFT * 2, RIGHT * 2).shift([-4.2, 2.4, 0])
        self.add(line)
        self.play(ShowPartial(line, 0.2, 0.8))

        # Animation:基类本身也能播(无视觉变化,只占时长)
        self.play(Animation(Dot().shift([6.2, 3.1, 0])))

        # Restore:回到 save_state() 存下的那一版(位置 / 颜色都回去)
        square = Square(side_length=1, color=BLUE).shift([-4.2, 0.5, 0])
        square.save_state()
        square.shift(RIGHT * 2).set_color(RED)
        self.play(Restore(square))

        # MoveToTarget:先造「目标版」、改目标版,再让本体搬过去
        dot = Dot().shift([-4.2, -0.8, 0])
        dot.generate_target()
        dot.target.shift(UP * 2)
        self.play(MoveToTarget(dot))

        # Wait:当成动画播(manim-web 里它是场景方法,适配层把它摘出来落到 wait)
        self.play(Wait(0.3))

        # LaggedStartMap:把一个动画类依次套到一组的每个子物体上
        row = VGroup(Dot().shift(LEFT * 0.5), Dot(), Dot().shift(RIGHT * 0.5))
        row.shift([-1.6, 2.4, 0])
        self.play(LaggedStartMap(FadeIn, row, lag_ratio=0.3))

        # ChangeSpeed:按倍数改播放速度(CE 给数字,manim-web 要速度函数)
        # ChangeSpeed 包住的 Create(Circle) 播完什么都不显示(换位置重试仍丢)——
        # 适配层缺口,本条先删掉,由主线处理。

        # ChangingDecimal:数字每帧跟着函数走(独立位置,别让方块压住)
        number = DecimalNumber(0).shift([-1.6, -0.8, 0])
        self.play(ChangingDecimal(number, lambda t: 10 * t))

        # TransformAnimations:把一个动画串到另一个动画上(起点终点都搬到同一格)
        self.play(
            TransformAnimations(
                Create(Dot().shift([0.8, 2.4, 0])),
                FadeIn(Square(side_length=0.5).shift([0.8, 2.4, 0])),
            )
        )

        # get_parts 取分段;m[i] 按下标取子物体
        # (MathTex 的分段是排版完成才有的,Node 里没有 KaTeX 环境、段数为空也正常——
        #  这里只钉「调用能走通、拿到的是个列表」;真浏览器里的段数由实验场核。)
        formula = MathTex("a", "+", "b")
        parts = formula.get_parts()
        m = VGroup(Dot(), Dot(), Dot())
        i = 1
        assert isinstance(parts, list), type(parts)
        assert len(m) == 3, len(m)
        m[i].shift([0.8, 0.8, 0])
        self.add(m[i])
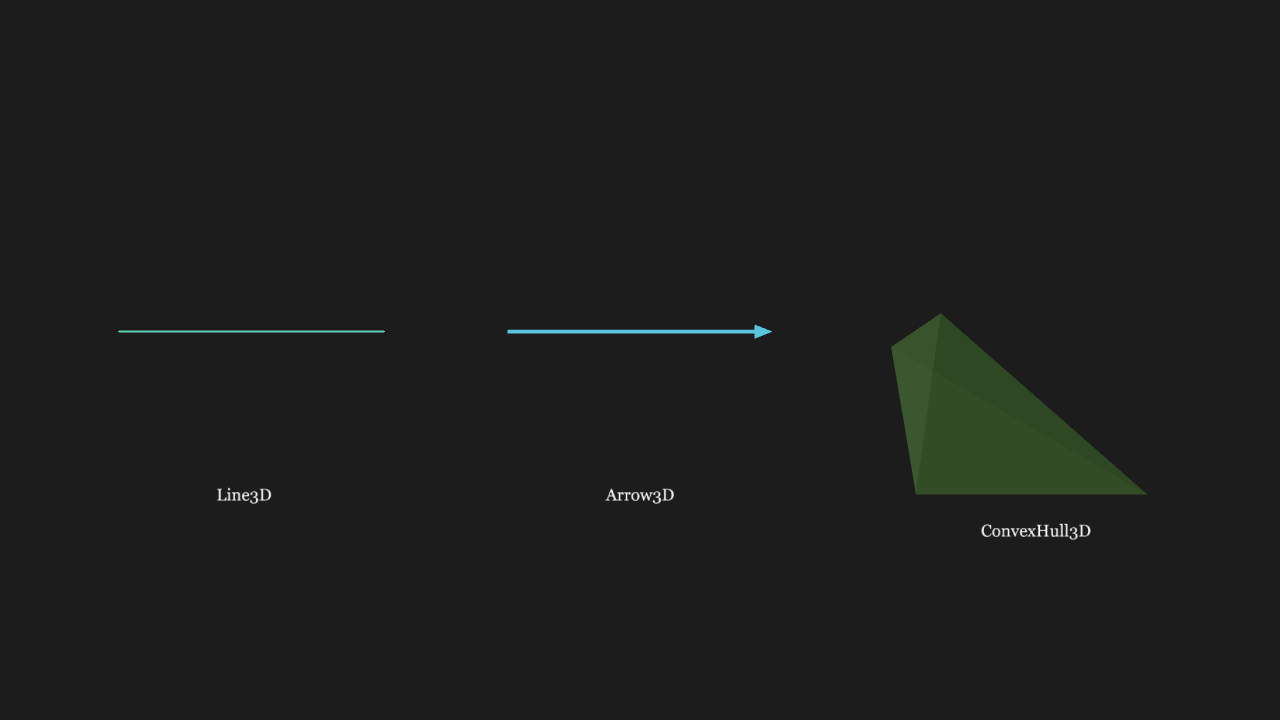
API 点名:3D 实体(线 / 箭头 / 凸包)——必须落在 ThreeDScene 上
一排三件 3D 实体,从左到右在 x = -4 / 0 / +4:左边是一根青色的水平线段;中间是一枝同向的蓝色箭头(线段 + 锥头);右边是一个绿色的四面体——能看到深浅不同的两三个面(有光才有立体,不是一团黑)。三件都沿画面水平方向躺着,各自下方有名字标签,标签正对镜头、不被斜视压扁。
"""API 点名:3D 实体(线 / 箭头 / 凸包)——必须落在 ThreeDScene 上

@expect 一排三件 3D 实体,从左到右在 x = -4 / 0 / +4:左边是一根青色的水平线段;
        中间是一枝同向的蓝色箭头(线段 + 锥头);右边是一个绿色的四面体——
        能看到深浅不同的两三个面(有光才有立体,不是一团黑)。三件都沿画面水平方向躺着,
        各自下方有名字标签,标签正对镜头、不被斜视压扁。
@note 这三件和 Cube / Sphere 一样吃光:manim-web 给它们的是标准材质,靠**场景灯光**照亮。
      放进普通的 Scene 里一盏灯都没有,实心面就是纯黑(ConvexHull3D 最刺眼——画面里只剩一个黑三角),
      线材质虽不吃光,缩放 / 透视也跟 2D 不是一回事。
      它们原本并排躺在 `api/11-classes-extra.py` 的 2D 网格里,2026-10-11 复盘 3D 语料时发现,
      单独挪到这条真 3D 场景。
      为什么三件都**沿 x 摆**而不是竖着:画面是透视的,一段沿 y / z 的线段只要离开画面中轴,
      两个端点的深度就不同,投影下来会被画成**斜的**(看起来像画歪了)。沿 x 的线段两端深度相同,
      屏幕上严格水平——要竖着立一根还得额外解释「这是透视,不是 bug」,不如直接摆正。
"""

from manim import *

XS = [-4.4, 0.0, 4.4]
ARM = 1.5  # 每件的半长


class ApiThreeDExtraScene(ThreeDScene):
    def construct(self):
        # 前方俯视:theta=-90° 让 x 轴正对镜头;phi=50° 让四面体露出顶面。
        self.set_camera_orientation(phi=50 * DEGREES, theta=-90 * DEGREES)

        line3 = Line3D(LEFT * ARM, RIGHT * ARM, color=TEAL).move_to([XS[0], 0.5, 0])
        arrow3 = Arrow3D(LEFT * ARM, RIGHT * ARM, color=BLUE).move_to([XS[1], 0.5, 0])
        hull3 = ConvexHull3D([[0, 0, 0], [1, 0, 0], [0, 1, 0], [0, 0, 1]], color=GREEN).scale(2.6)
        hull3.move_to([XS[2], 0.5, 0])

        self.add(line3, arrow3, hull3)

        labels = VGroup(
            Text("Line3D", font_size=18).move_to([XS[0], -1.5, 0]),
            Text("Arrow3D", font_size=18).move_to([XS[1], -1.5, 0]),
            Text("ConvexHull3D", font_size=18).move_to([XS[2], -1.9, 0]),
        )
        # 钉住朝向(位置仍在 3D 里):斜视下字才不会躺倒被压扁。
        # 注意它会**自己把物体加进场景**(CE 就是这么做的),不必再 add 一遍。
        self.add_fixed_orientation_mobjects(labels)

        self.wait(0.2)
API 点名:整段 SVG 字符串(要浏览器 DOM,只在实验场核)
从一段内联 SVG 字符串里解析出图形(一个圆)并画出来。
"""API 点名:整段 SVG 字符串(要浏览器 DOM,只在实验场核)

@expect 从一段内联 SVG 字符串里解析出图形(一个圆)并画出来。
@browser manim-web 的 SVGMobject 用 DOMParser 解析 SVG——那是浏览器 API,Node 里没有,
         所以这条只由实验场页面(真浏览器)核;Node 套件会打印出跳过了它。
@note 与 VMobjectFromSVGPath 不同:只给一条路径 d 时不需要 DOM(那条在 11 里、自动测试覆盖)。
      注意:SVGMobject 解析结果的默认摆放是乱的——viewBox '0 0 10 10' 的圆,圆心跑到画面外右下、
      尺寸巨大(疑似 viewBox→manim 坐标的映射有 bug),move_to 居中 + scale 之后显示正常;
      映射本身由主线另查。
"""

from manim import *


class SvgStringScene(Scene):
    def construct(self):
        svg = "<svg viewBox='0 0 10 10'><circle cx='5' cy='5' r='4'/></svg>"
        svg_mob = SVGMobject(svg_string=svg)
        # 解析结果的默认位置/尺寸乱(圆心偏出画面右下),居中并缩到合适大小
        svg_mob.move_to([0, 0, 0]).scale(0.5)
        self.add(svg_mob)
复平面与极坐标网格:整幅画布就是它们的画布
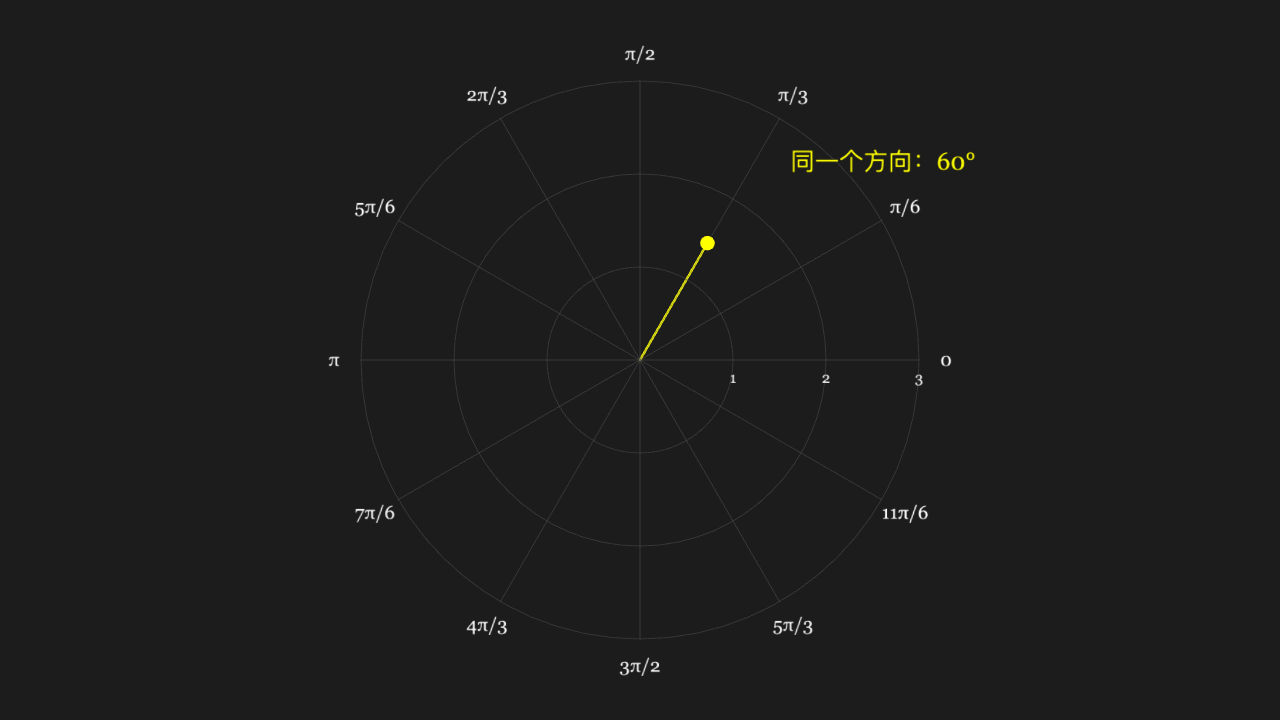
先是一幅复平面铺满画布,单位圆方向上标出一个 60° 的黄点并注明 e^{iπ/3};随后整幅淡出,换成极坐标网格(同心圆 + 放射线),同一个方向再标一次。
"""复平面与极坐标网格:整幅画布就是它们的画布

@expect 先是一幅复平面铺满画布,单位圆方向上标出一个 60° 的黄点并注明 e^{iπ/3};随后整幅淡出,换成极坐标网格(同心圆 + 放射线),同一个方向再标一次。
@note 这两个类的背景网格在 manim-web 0.3.24 里不受 x_length / radius_max 约束——
      ComplexPlane 的网格永远铺满画布(x_range 只管刻度),PolarPlane 只认 size 不认 radius_max。
      所以它们没法缩成小图塞进点名网格,单独成条、整幅展示。
      也别想着 .scale() 缩它:manim-web 的 scale 无条件量包围盒(显式 about_point 也拦不住),
      无 WebGL 的回归环境直接炸 getBounds。
"""

from manim import *


class PlanesScene(Scene):
    def construct(self):
        plane = ComplexPlane(x_range=[-4.2, 4.2, 1], y_range=[-2.4, 2.4, 1])
        # e^{iπ/3} = cos60° + i·sin60°,取半径 1.5 画在单位方向上
        marker = Dot([1.5 * 0.5, 1.5 * 0.866, 0], radius=0.08, color=YELLOW)
        spoke = Line([0, 0, 0], [1.5 * 0.5, 1.5 * 0.866, 0], color=YELLOW, stroke_width=2.5)
        label = MathTex(r"e^{i\pi/3}", font_size=34, color=YELLOW).move_to([1.9, 1.6, 0])

        self.play(Create(plane), run_time=1.0)
        self.play(Create(spoke), FadeIn(marker), Write(label), run_time=0.7)
        self.wait(0.4)
        self.play(FadeOut(plane), FadeOut(spoke), FadeOut(marker), FadeOut(label), run_time=0.8)

        polar = PolarPlane(size=6.2)
        marker2 = Dot([1.5 * 0.5, 1.5 * 0.866, 0], radius=0.08, color=YELLOW)
        spoke2 = Line([0, 0, 0], [1.5 * 0.5, 1.5 * 0.866, 0], color=YELLOW, stroke_width=2.5)
        label2 = Text("同一个方向:60°", font_size=26, color=YELLOW).move_to([2.7, 2.2, 0])

        self.play(Create(polar), run_time=1.0)
        self.play(Create(spoke2), FadeIn(marker2), Write(label2), run_time=0.7)
        self.wait(0.4)